How to Replace a Kitchen Faucet
Learn how to replace a kitchen faucet and install shut-off valves beneath the kitchen sink.
As part of a larger kitchen renovation project, a homeowner wants to start with the simple replacement of the kitchen faucet with a new model that he has already purchased. The original faucet is a single tap and lever model. As part of the faucet retrofit, we install shut-off valves and then update with a single tap and individual water valves.
To view a video showing how a compression fitting works cllick here.
Read More
Shut off the Water Supply Lines to the Kitchen Faucet
Turn off the hot and cold water supply to the kitchen faucet--we found the shutoff valves that controlled the first floor in the basement. Open the kitchen faucet to bleed off the water and any remaining water pressure.

Remove the PVC Plumbing and Hoses below the Kitchen Sink
Remove the sink drain, starting with the dish washer hose and PVC plastic plumbing to provide more room and easier access. Removal is simple and reinstallation will be, too.

Detach the Copper Water Lines beneath the Sink
Cut the copper water lines with a pipe cutter to detach the lines from the faucet. You will install new shutoff valves beneath the sink so the water supply can be shut off without disturbing the rest of the house.

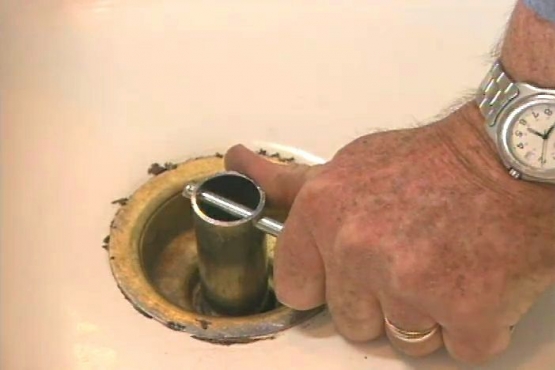
Loosen and Remove the Old Kitchen Faucet and Water Lines
Use a basin wrench to loosen cut water lines from the faucet and loosen the retaining nut that holds the faucet base. Lift out the old kitchen faucet and remove the old plumbers putty without scratching the stainless steel sink.

Install New Shutoff Valves below the Kitchen Faucet
Install new shutoff valves on the incoming water lines below the sink. Slip the valves over the ends of the copper pipes and tighten the compression fitting with two wrenches to avoid spinning the fitting and twisting the pipe.

Mount the New Kitchen Faucet on the Sink
Place a rubber O-ring on the new kitchen faucet base and insert it into the precut hole in the sink. Secure the mounting plate beneath the sink and secure it with a retaining nut and the plastic socket provided.

Insert the Spray Nozzle Hose into the Kitchen Faucet
Insert the spray nozzle hose into the end of the faucet, pushing it through and out the bottom. Push the hose all the way through and out the bottom side of the faucet base.

Apply Plumber's Putty
Apply plumbers putty to water valve bases. Insert the valves upwards through the sink, add C-rings, and hand-tighten the nuts beneath. Finish with the basin wrench. Clip on the hose that connects the valves to the faucets.

Connect the New Kitchen Faucet to the Water Lines
Connect the new water supply lines to the kitchen faucet and new shutoff valves. Screw the valve handles and trim on top of the valve bodies. Install the pump housing and pump for the liquid soap dispenser.

Reinstall the Plumbing beneath the Sink and Leak Test
Replace the drain plumbing beneath the sink, including the P-trap assembly and the dish washer hose. Lay paper towels on the bottom of the cabinet to test for leaks before you turn on the water at the shutoff valves.
Related Tips


Blog Articles

Have You Heard of Landscape Glue?
You love the rustic charm of a gravel walkway, but the constant scattering of stones across your lawn and patio can be a real headache. Whether it’s from pets, lawn mowers, or just foot traffic, it seems impossible to keep those stones in place. Sound familiar? Well, Brian shows us a simple DIY method using landscape glue to keep your gravel path looking pristine and, more importantly, in place.

How to Remove Candle Wax Drips: Two Effective Methods
Candles create a warm and inviting atmosphere, but those pesky wax drips can be a real headache. Luckily, Brian shows us a couple of effective methods to tackle this issue, and they involve two very different temperatures: hot and cold. Here, we'll explore two effective methods: one using cold and the other using heat.

Guide to Hanging on Masonry Walls
Ever wondered how to hang that picture frame or shelf on a brick or concrete wall? It can seem daunting, but with the right tools and techniques, it's a straightforward DIY project. This guide breaks down two common methods: using concrete screws and using anchors, making it easy for you to tackle your next hanging project.


