RON HAZELTON: [music]
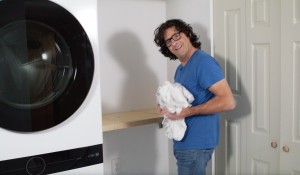
Now our laundry room, like many, is just about big enough for the washer and dryer. When I think about it though, a lot happens in that space besides washing a drying. There is sorting, folding, ironing… why, there is a beehive of activity. Maybe that is why my wife Lynn wants to make every square inch count.
LYNN:
We need some kind of ledge somewhere we can put laundry and sort it.
RON HAZELTON:
Uh, what about the appliances, the washer and dryer themselves?
LYNN:
Um, I think I would really like to get updated appliances.
RON HAZELTON:
And the cabinets, you still want storage up there?
LYNN:
Oh definitely, you have to have something to store all your detergents, I do need something where the clothes can be hung once they come out of the washer, if they’re not going to be put in the dryer.
RON HAZELTON:
Like a rack?
LYNN:
Yeah, just like some kind of pole.
[music]
RON HAZELTON:
Well I’ve taken Lynn’s suggestions into consideration and come up with a plan that I think is going to work quite well. It involves moving this, the washer and dryer, from over here to this wall underneath the window, putting a couple of cabinets in each corner: one here, and one here. Adding a run of cabinets down this wall, and adding a drop leaf table underneath.
[music]
RON HAZELTON:
To remove the wallpaper, I first perforate it… then spray on an enzyme-type remover. I give the chemical stripper plenty of time to work, then just peel off the old paper. Next I say goodbye to the old dryer and pull down the old cabinetry.
The new washing machine location means new plumbing. I begin by installing a recessed shutoff valve and outlet box. Once it’s in place, I start putting together the drainpipe. I transition from plastic to copper pipe because I have very limited space to work with here and also because the rest of my plumbing is copper.
The drain will pass through the floor and into the basement below, where I’ll hook it up to the existing system.
When putting together pipe runs with lots of twists and turns, I pre-assemble sub-sections, then solder the remaining joints, once everything’s in place.
Next, I cut smaller, half-inch copper pipe for the water lines and attach then to the shutoff valve. Because this is an exterior wall, I’m using foam insulation sleeves and also packing plenty of fiberglass between the pipes and the outer wall.
RON HAZELTON:
The last step here is to replace the wallboard. Both the washer and dryer will need electrical outlets. After cutting the holes, I thread wire up from the basement… set the boxes in place… connect the receptacles… and attach the cover plates.
I’m locating the hole for the dryer vent so that it’s directly opposite the outlet on the machine. This way, I’ll avoid any bends, turns or kinks in the vent pipe and maximize the dryer’s efficiency by streamlining the air flow.
RON HAZELTON:
Now, originally, I was going to use particleboard and cover it with plastic laminate, but instead, I’ve decided to use these melamine panels. They are covered with this vinyl coating on the top, bottom, and around the edge. The only disadvantage to this material is because of the covering, I really can’t glue the components together, so I am going to use this joinery system over here. It is called pocket hole joinery. I’ll show you more about this in just a moment.
Now I want to start by building the unit that actually attaches to the wall, look at the underbelly here you’ll really see it’s kind of a box with braces. In fact I am going to flip this over so you can see it from the bottom because we’re going to build this bottom side up. We’ll start by putting in a front rail, then adding two ends, some mid-supports, and finally the rear rail and then when that is all done we’ll add the leaf.
RON HAZELTON:
The first thing to do is cut a couple of the panels into strips for the table apron and braces.
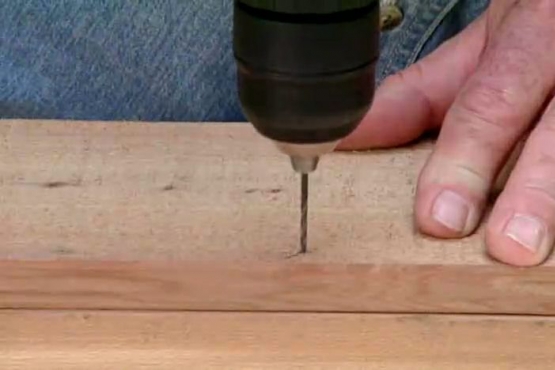
Pocket hole joinery relies on a jig that holds the drill bit at a steep angle and produces a hole that runs almost parallel to the face of the board. Special screws are inserted into these holes and, when driven in, pull the boards tightly together.
Now, this is the portion of the drop leaf table that is going to mount up against the wall, just like this, and next we’ll go ahead and put the drop leaf itself on. That’s just another piece of the same melamine, 12 inches wide, 4 feet long. Goes right in here like that. Now remember, we are looking at this bottom-side up, and then that leaf will get attached with a strip of piano hinge.
This self-centering drill bit positions the pilot holes directly in the center of the pre-drilled hinge holes and keeps from pulling the hinge out of alignment as the screws are driven in. What really makes this table work as a drop leaf table is this folding and locking support brace.
Well, now it’s time to put up the cabinets. Now, this isn’t going to be too difficult a job, but I am working alone, so I’m going to have to employ a couple of techniques to make the job more manageable. First, I’ve taken the shelves out and the doors off the cases. That’s going to make these lighter and more manageable. Secondly, I am going to attach this strip of wood, which I call a ledger, to the wall temporarily.
RON HAZELTON: [music]
I screw the ledger into the studs, then set the bottom edge of the cabinets on it.
Now this simple little T-shaped brace will allow me to keep my hands free while I attach the cabinets to the wall.
The first cabinet I secure to the wall with screws. Then I set the next one on the ledger, clamp the front edge tightly, drill countersunk pilot holes and screw the face frames together. Then I remove the clamps and move on to the next cabinet.
Once the cases are up, I remove the ledger and, finally, re-install the doors.
RON HAZELTON: [music]
Ah, very nice. Just a couple more of these to do.
I install yet another ledger to hold up the rear edge of the folding table then use one of my work supports to prop up the front while I attach the table to wall studs with lag screws.
Well my plan’s coming along nicely… the folding table’s up and the cabinets are hung. I do believe it’s time to do a little shopping for a washer and dryer.
RON HAZELTON:
Now, some of the research I’ve been looking at says these front-loading washing machines are quieter, faster, use less water, and are gentler on clothes. Now my only concern is that I’ve got a very small laundry room and I’m not sure that I can accommodate this swinging door. So, I’ve been looking at this; this is brand new from Maytag. It has a lot of the front-load technology in it, but it is a top load unit and I think this may be the way I’ll go.
[music]
Well that’s it. Everything’s in and I’m going to put it all to the test myself. When you open this top loader, one of the first things you notice is that there is no agitator…these rotating disks do the work instead. This high-tech machine uses less power and water and requires a special high-efficiency detergent for best results. Detergent, fabric softener and bleach are dispensed automatically.
RON HAZELTON:
The control panel even has a countdown clock that lets me know how soon the load will be finished. The folding table is out of the way until I need it. And when it’s up, there’s plenty of space for sorting and folding – now, I am doing this only for purposes of demonstration, you understand.
I’ve also installed this ironing board that not only folds down, but rotates to the most comfortable and convenient position. Our new iron has a heating base that plugs in…but the iron itself is… that’s right…cordless!
And the ironing board? When I’m finished it’s up, up and away.
Now I haven’t forgotten that Lynn asked me for some hanging space. This pullout rack should do the trick, and it’ll fold up against the wall when it’s not needed.
RON HAZELTON:
Well, this passes the Hazelton practicality test; let’s see what the wife thinks of it.
[music]
Lynn, take a look, hon.
LYNN:
Wooooooow, wowee.


