Ron:
This is Sally Lee, editor-in-chief of Parents Magazine. And she’s here because we’re going to build today, together, a project for parents and children.
Sally:
A growth chart.
Ron:
So this is kind of what I had in mind here. Sort of a rocket ship. You know, because you’re growing up, the rocket ship goes up, all that stuff.
Sally:
That’s a great idea.
Ron:
So the background right here is actually going to be made of this stuff right here, peg board, but I want to start by working on the nose cone up here.
RON:
WE BEGIN BY DRAWING THE TRIANGULAR SHAPED NOSECONE ONTO A ONE BY TWELVE PIECE OF PINE.
Ron:
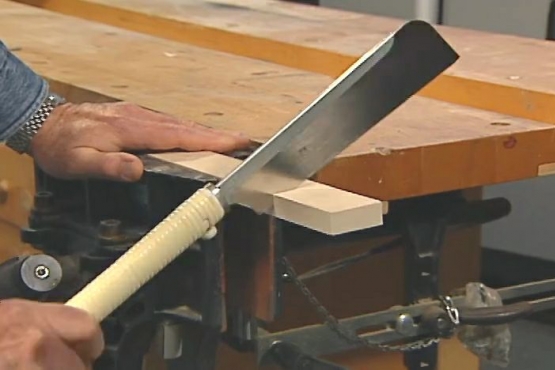
So this is a Japanese hand saw. And I really…Are you experienced with hand saws?
Sally:
No, no. Not at all.
Ron:
Well, I think you’ll really fall in love with this one. This is so easy to use from the very first. It’s a design that’s remained virtually unchanged for hundreds if not thousands of years in Japan. They were originally made by Japanese sword makers. And, so, let me show you how to use this. Unlike western saws, this saw cuts as you pull it toward you.
Sally:
I guess this is pretty good for the biceps, too.
Ron:
Oh, it’s wonderful for the biceps.
Sally:
Whoa. That’s pretty good.
Ron:
There you go. Very nice. Very nice.
Ron:
Tip it up a little bit. There you go. Perfect. Perfect.
Sally:
I think this is my next father’s day gift
Sally:
Ta dah!
Ron:
So here’s the base of our rocket. Here’s the nose cone of our rocket, now we’ve just got to start working on what goes in the middle.
Sally:
It’s great. We’re almost ready for blast off.
Ron:
I think so. I feel it starting to go…!
Ron:
So this is going to form the body of our rocket ship right here. It’s peg board, and the reason I’ve chosen this is because it’s got these quarter-inch holes that are uniformly spaced exactly an inch apart. So we can actually kind of use it as a ruler if you will.
Sally:
That’s great.
Ron:
Go Sally!
Sally:
Ta Dah!
RON:
NEXT WE TRANSFER THE DIMENSIONS OF THE NOSECONE TO OUR PEG BOARD AND THEN TRIM AWAY THE EXCESS.
Ron:
All right!
Ron:
So, Sally, now we’re going to begin to apply some moldings to the edge. To kind of give it some thickness, and also to cover up – although I hate to cover up that cut. That was perfect!
Sally:
Was it good?
Ron:
It was perfect. This is some wood glue, there’s a brush there. Let’s just brush some glue on the back of this little strip of molding here. This would definitely be a part of it that a child could help with. So we’re going to put this right on the edge…
RON-VO:
WE TURN THE PEGBOARD OVER AND CUT OFF THE EXCESS TRIM. NEXT WE GLUE DOWN THE NOSECONE, THE BASE AND SOME TRIM ALONG THE FRONT EDGES. WHILE THE GLUE DRIES, WE HOLD EVERYTHING TOGETHER WITH CLAMPS.
Ron:
To make the markers that are going to record each child’s height, we’re going to take the same wood we used for the trim, and I’ve just clamped on top of the strip of it, a scrap of pegboard. And we’re going to use this pegboard as a template, because I want to drill some small holes in here. What’s going to actually happen is we’re going to cut this into short pieces, put some little dowels in here, then stick them into the peg board.
Sally:
Great.
Ron:
I’ve put a piece of tape on the drill bit right here as a depth guide or depth gauge, so as you drill in, only drill up to the edge of the tape.
Ron:
So now we’re going to cut these into short sections.
Sally:
Mmm, hmm.
Sally:
The zen of sawing.
Ron:
The zen. Become one…
Sally:
…With the saw!
Ron:
You have done it. You’re there. You’re in the saw zone.
Sally:
That’s right.
RON-VO:
WE DAB A BIT OF GLUE INSIDE EACH HOLE IN OUR MARKERS AND THEN TAP IN A COUPLE OF QUARTER INCH DOWELS FOR PEGS.
Ron:
Okay. Now, just to be sure that everything fits, before the glue dries, we’re going to actually put them into a couple of holes here. That’ll help align everything like that.
Ron:
Okay. Looks good! Right?
Sally:
Looks great.
Ron:
Needs a little color.
Sally:
It does.
Ron:
Let’s grab some paint and come back and do a little decorating on this.
Sally:
Wonderful.
Ron:
Shall we paint?
Sally:
I’m ready.
Ron:
Do you want to take the base down there?
Sally:
Yes.
Ron:
What color are you going to use?
Sally:
I think I’m going to use blue here.
Ron:
Okay. I’m using yellow for the peg board.
Sally:
And this is a gloss paint, right?
Ron:
This is gloss. And the reason I’ve gone with gloss on this is that it’s easy to clean, finger prints and pen marks come right off. Now, this is going to take more than one coat to cover, because the hard board here is very dark. And I don’t want to lay on too much paint, because I don’t want to clog up the holes.
RON-VO:
BUT TO BE ON THE SAFE SIDE, I’M RUNNING A PIECE OF DOWEL THROUGH EACH HOLE TO CLEAR AWAY ANY EXCESS PAINT.
Ron:
And we have a rocket ship! You know you could have a lot of fun with this right now just by decorating it. One thing that would be a good idea would be to put the actual measurements on. You could either paint it, or you could put one of those cloth sewing tape measures and just glue right up here.
Sally:
Oh, what a great idea!
Ron:
What would you put up here?
Sally:
I think I’d put something like, “Reach for the stars.”
Ron:
Oh, I like that. Very much. You could also put other things down here. And of course these just move, as the child grows up. You can pull that one up and just move it up to the next notch.
Sally:
There we go.
Ron:
And of course they can be personalized. Matter of fact, I’m going to personalize this with my daughter’s name. Lets see, D-A-N-I-E-L-L-E. Now, she isn’t very big right now, so I’ll put this down here. She’s going to have to grow into this.
Ron:
Well thank you so much, Sally, for coming over here from Parent’s Magazine.
Sally:
Thank you.
Ron:
This is a wonderful project…
Sally:
That’s right. For parents and for kids.
Ron:
And for kids.
