RON HAZELTON:
You know if I think of my back yard almost as an extension of my home. So today we are going to do some exterior decorating in the form of low voltage landscape lighting. It’s amazing how the right lights can transform outdoor space into an enchanted night time setting. This is a terrific do it yourself project if you have a good plan, use the right devices and know a few simple installation tricks. I can promise you that you’ll get all that and more in today’s show.
To me, landscaping is to my outdoor space what furniture, carpeting and accessories are to the inside. I love to take this in during the daytime, but you know what happens at night? It goes black. So I want to consider some landscape lighting, but most important of all, I want it to look natural.
So I've asked lighting designers, Gary Novosel and Rachel Pfeiffer to help me out.
You know, I, I sort of look at this as a blank canvas, if you will.
GARY NOVOSELL:
You know, what I like to do is, look at what the natural landscaping is already saying. There's a theme, there is a design that's already been conceived here and what I find is useful, is to start with that as -- in terms of composition.
RON HAZELTON:
My theme is very much about trees, so that's where we'll start. Gary explains that one way to light trees is from the ground upward, a technique called uplighting. This Japanese maple is a good candidate.
GARY NOVOSELL:
These trees are uniquely sculptural and the, the skeletal structure, the branch structure is so open and beautiful twists and turns. Well, we have another opportunity here with the curly willow. You can see, it also has a very wonderful sculptural shape to it.
RON HAZELTON:
Some trees can also be lit from the top downward, to simulate moonlight filtering through the branches.
GARY NOVOSELL:
Well, we can start with this tree by installing a very small fixture that would have a pale blue lens on it, casting light down over this area and we also try to capture some of the light and shadow that will be created as the light passes through leaves and stems.
RACHEL PEIFFER:
It's also a matter of drama. Adding drama to the setting.
RON HAZELTON:
Well, you know what my lighting's been out here?
GARY NOVOSELL:
What?
RON HAZELTON:
Look up here. [LAUGHS]
GARY NOVOSELL:
Oh, my.
RON HAZELTON:
There's something over here I want to show you. This is one of my favorite daytime landscaping elements right here, the pond. Does that offer an opportunity for, for lighting at night?
GARY NOVOSELL:
It's a beautiful little feature and of course the, the focal point is the waterfall, so I'd like to get a little bit of light on that. But I think you want to see the whole pond with the plantings. We're fortunate to have this tree right next to us, and that gives us another opportunity for some of that moonlighting.
RON HAZELTON:
This is my -- one of two arbors I've got here.
GARY NOVOSELL:
Well, that's a beauty.
RON HAZELTON:
I love this because it's really -- you know, it's got the canopy well established over at the bittersweet. In fact, I was gonna rent the house out for weddings, once. [LAUGHS]
[LAUGHTER]
GARY NOVOSELL:
And the way you've got the, the plantings on it is just -- just perfect for lighting. What I would propose would be to install fixtures on both the left and right sides, down at grade level, and then shooting up and that would light the entire object.
So I think that's the way we should approach this.
RON HAZELTON:
Now this is the other arbor here. This, this is relatively new. I just put this in as a matter of fact. No foliage on this.
RACHEL PEIFFER:
I think this might be the place to light it using a light at the top, rather than accenting it from the bottom.
RON HAZELTON:
This is my birthday gift.
[BOTH SPEAK AT ONCE]
I love this. I don't know if it offers any opportunity or not.
RACHEL PEIFFER:
I think it definitely does. Put a, a fixture actually in the water and get some sparkle and -- and reflection.
RON HAZELTON:
There is this tree over here which I've been wondering about.
GARY NOVOSELL:
When you're in a room at night and you look out, the windows become black. By illuminating the landscape features that are outside that window, it all of a sudden becomes transparent again and it brings that tree into the room, as part of the room.
RON HAZELTON:
Now that we've covered everything, what would be the next step?
GARY NOVOSELL:
Well, the first thing that's gonna happen is, Rachel and I are gonna make a sketch of the property. Not terribly elaborate, but just enough that we have a good reasonable resemblance of the property and the key features on it.
We will then go back to our studio and we will create lighting specifications that will indicate all of this precise exact fixture, bits and pieces and parts that will be required.
RON HAZELTON:
Now here's the plan that Gary and Rachel have worked up. It shows the location of every light, and includes a table describes every fixture. So, I know exactly what to order. Once I approve it all, Gary and Rachel come back and mark the actual fixture locations with landscaping flags. A few day later, I have all my materials and I'm ready to go to work.
Now these are what put the low in low voltage lighting. They're transformers and they'll reduce my household current of 110 to 120 volts, down to about 12 volts, which is relatively safe to work with. Now, from the outside, they look like metal boxes, but inside, it's a different story.
In this transformer from Loran, there are a series of terminals to which the light fixture wires will be connected. These fuses protect four separate circuits. This transformer from Intermatic, has the wire terminals on the bottom.
I used stainless steel screws to mount transformers. Dipping them first in silicone caulk, helps prevent any water leaks. The mounting bracket on the back has slotted holes that slip over the screw heads. This plastic conduit will protect the wires from any damage where they're above ground.
Once the conduit's in place, I slip the wires inside, pull them into the box, strip off the insulation, twist the strands and attach the ends to the terminals. Transformers can be turned on and off manually or automatically. In this Loran unit, I'm installing a photoelectric cell and a timer.
The photoelectric device will turn the lights on at dusk, and a timer will shut them off at whatever time I choose. Once everything's in place, I back fill around the plastic conduit. Put the cover on the transformer and plug into a nearby outlet. Here, I don't have an exterior wall, so I'm putting in a post, to which I can mount the transformer.
I attach a piece of exterior gray plywood and drive in the mounting screws. [DRILL] Since the terminals on this Intermatic transformer are on the bottom, I'm going to make the connections first, then mount the transformer. This model comes with a built in timer.
[MUSIC]
When we come back lights, lights and lights.
Now I can begin running the cable.
I lay the wire out loosely following the flag markers Gary and Rachel put out for me earlier. Now here's where I need to check the lighting plan. Depending on its size, a single transformer can only provide power to so many fixtures. It's important to balance the load and use enough transformers to handle the demand.
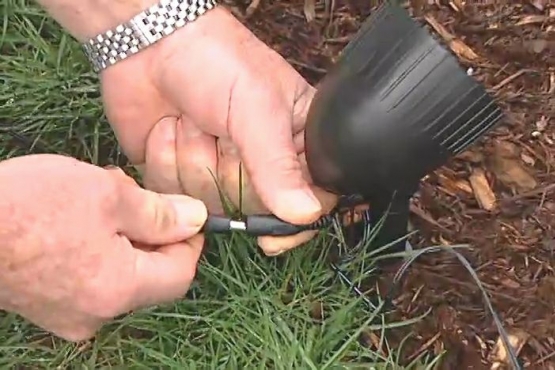
This uplight fixture from Loran needs to be spliced into the low voltage wire. I cut the wire near each fixture location, strip off the insulation, twist the fixture wire and line wire together, slip the wires into this brass barrel, tighten the set screw, slip a piece of tubing over the joint, then hit it with a propane torch.
This special tubing shrinks as it's heated and silicone inside melts, providing a permanent watertight seal. I'm driving a straight prybar into the ground to create a hole for the mounting stake. After setting it in place, I use the end of the mallet handle to compact the soil around the stake.
Here in these flowerbeds, I'll dig a shallow trench, fold the wire back upon itself and cover it up. The extra wire I've left will allow me to relocate the fixture later, if I want to.
This light fixture from Intermatic has a different type of wire connector. These two interlocking clips can be attached anywhere along the line wire. Two prongs penetrate the insulation and make contact with the wire conductor inside.
In this case, it's not necessary to cut the wire to make a connection. The best way to run wire along the edge of a driveway to a patio is by cutting a narrow slot, using a flat garden spade, leveraging the spade against the pavement.
A thin piece of wood makes a handy tool for pushing the wire to the bottom of the groove. The slot can be easily closed by pressing it down by foot. The same technique is used to lay wire across a lawn. I'm working the garden spade back and forth to create a narrow V in the ground, about six inches deep and again, push the wire to the bottom.
As I enter the bed, I slip a foot long piece of plastic conduit over the wire to protect it from damage I might inflict when I'm doing my edging next spring. To close the groove, I just press the sod back in place.
The uplights that we've put in so far, so-called bullet lights, are designed to sit on top of the ground. Now that's fine in bushes and shrubs and ground cover. But out here in this area, I've got grass. That means I'm going to be mowing and having something like this sticking up -- well, that could be a problem.
So instead, here I'm going to use lights like these. These are called well lights and they're designed actually to be put into the ground so that the top of these is flush with the surface. Using a post spade, I remove the sod, then switch to a post hole digger.
In the bottom of the hole, I like to place a little gravel for drainage. Once I'm satisfied the hole is the correct depth, I make the wire connections. This fixture from Loran, calls for a watertight splice.
Once I'm finished, I lay the wire in the trench, backfill the hole and close it up. Intermatic's version of the well light is slightly larger in diameter and a bit shallower. This one, like most Intermatic low-voltage fixtures, uses this pressed together insulation-piercing connector.
Now I want to do some downlighting. Now, again downlighting involves putting a fixture up in the tree and casting the light downward onto the ground sort of to simulate moonlight. I’m going to be using this compact fixture right here. All I have to do is screw the lens on and then take it up. In this case about 20 feet up. Now, who says I don’t do my own stunts? The trick, as it turns out, is to hang onto the light and clutch the tree limb at the same time while I attach, then aim the fixture. The pond will be lit from above and below. This Loran underwater fixture called the Porpoise, is omni directional and comes with a weighted base.
Intermatic's underwater light uses a spot or flood lamp and has a ring base that can be weighted. The arbor will be illuminated by four uplights, placed in the ground at each corner. These slim, solid copper fixtures from Loran will tuck out of the way, and darken naturally when exposed to weather.
I'll get more even lighting if the light beams are crisscrossed, rather than being aimed straight up. Another option here would be to use these copper fixtures from Intermatic. The other arbor will be lit from the top downward with this perforated fixture that will glow at night. And my fountain? Well, it gets a small underwater light, no larger than a test tube. Obviously the effects of landscape lighting can only be appreciated at night. That's why I often set the lights in place, temporarily. Then go out after dark and tweak them to get just the effect I'm looking for.
From design to plan to installation to finished product. Now it's time to sit back and take in the show.
[MUSIC]
What I love so much during the day, has taken on a whole new look at night.


