Revamp Your Outdoor Space: How To Stencil A Concrete Patio

The Ultimate Guide To Creating A Beautiful DIY Stenciled Concrete Patio
Stenciling a concrete patio is a fantastic way to bring some personality and charm to your outdoor space. With a few simple steps, you can transform your plain concrete into a unique and colorful design that reflects your personal style. It's a fun and creative DIY project that can be done with just a few tools and paint. With stencils, you can create intricate patterns or designs on your concrete patio that are sure to impress your guests. Plus, it's an affordable way to give your patio a facelift without breaking the bank. After reading this guide, you’ll be ready to revamp your concrete patio into an outdoor oasis!
Materials:
- Paint (“Benjamin Moore Porch & Patio” was used in this project)
- Stencil (Large format 22x22 inches was used in this project)
- Paint roller, brush, or foam brush
- Paint tray
- Tape/removable adhesive spray
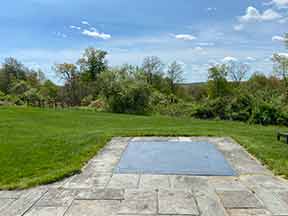
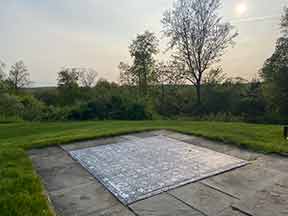
The story behi nd this particular project is that the previous owners of this home had a hot tub on their patio. When they moved out, only the unsightly concrete slab was left. The new owners didn’t want to purchase a hot tub nor did they want to jack hammer the concrete slab. So, instead of trying to hide it, they decided to embrace it and make it the centerpiece of their patio. Throughout this guide, you’ll see how they transformed a plain concrete slab into a beautifully stenciled concrete patio.
Preparing the concrete surface for stenciling
As with any paint project, taking the time to properly clean your surface before you begin can save you a headache later on. A clean surface allows the paint to adhere properly to the concrete and avoids particulates, like grass clippings or gravel to unwantedly enter your design. Without proper preparation, the stencil may not adhere well, resulting in premature wear and tear. 
You need to remove any dirt, debris, or stains on your concrete patio. Give it a good wash with dish soap and water and let the concrete dry completely before moving on to the next step. Taking the time to properly prepare a concrete surface for stenciling can greatly improve the quality and longevity of the final result.
Choosing the right stencil design
Consider the size of the stencil - and your space. The size of the stencil should be proportional to the size of the space you're stenciling. A large stencil for a small area may be overwhelming, while a small stencil for a large area may be underwhelming.
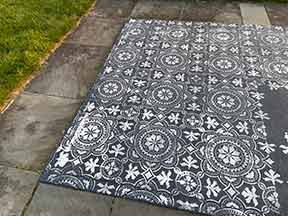
Consider the style of the area. In this particular project, the homeowners wanted to match the base color of the concrete slab with the bluestone patio that surrounds it. The stencil design and paint colors you choose should complement the overall style around you. For example, if you have a modern or minimalist space, a  simple geometric stencil design may be more fitting than a floral or ornate design.
Think about contrast. If you want the stencil design to stand out, choose paint colors that provide contrast. Don't be afraid to experiment: Stenciling allows you to be creative, so don't be afraid to try different paint color combinations. You can always do a small test stencil on a piece of scrap paper or cardboard to see how the colors look together.
Applying the base coat of paint to the entire patio surface
Once your patio is clean and dry, apply the base coat of paint to your concrete patio. Use a paint roller to apply the paint evenly across the entire surface. Allow the base coat to dry completely. You may need to apply multiple coats for full coverage. Be sure to allow each coat to dry completely before applying additional coats. If you need to, you can use this trick to keep your paint roller from drying out. A well-applied base coat will help ensure that your painted patio looks great and lasts for years to come.
Securing the stencil in place and painting over it with a contrasting color
When it comes to stenciling, securing it in place is crucial to achieving a clean and precise design. One effective way to do this is by using masking tape or removable adhesive spray to hold the stencil firmly against the surface. Once the stencil is secured, you can start painting!
Apply paint to your stencil
A roller, a paint brush or a foam brush are the most popular ways to paint your stencil onto your concrete patio. To achieve a stamped look similar to the one in this project, you’ll want to use a roller. The biggest mistake people make when stenciling is using too much paint. Apply a thin layer of paint over the stencil, being careful not to apply too much pressure that might cause paint to seep under the edges of the stencil.
Touching up any imperfections or mistakes with a small brush
Mistakes happen – and to fix them, you can use a small brush to touch up imperfections. A small, fine-tipped brush is generally the best option for precision work. When touching up, be sure to use thin layers of paint and build gradually until you achieve the desired effect.
With these tips and a few materials you’ll be able to transform your patio into a beautiful, custom, and comfortable space.
Recommended Articles

The How’s and Why’s of Upgrading a Central AC System
A step-by-step video demonstration showing removal and replacement of a central air conditioning system. Includes advantages of new, state-of the-art AC systems.

If You’ve Got a Project That Involves Demolition, You’ll Want to Know About This Tool.
I try out a new tool designed and engineered to do one task exceptionally well -- demolition.
