How to Make a Patio out of Concrete Pavers
Build a garden patio in a single day using interlocking pavers in a simple design that's easily expanded.
Interlock straight-edged and key-shaped pavers that fit together like puzzle pieces in a rectangular outdoor patio design. This small patio plan is simple and quick, yet easily expanded. Laying pavers on a footing of gravel and sand keeps the patio level and promotes drainage.
Read More
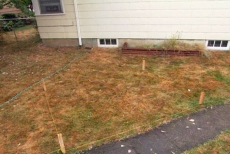
Consider Yard Features and Obstacles When Positioning the Patio
Position and size the patio to complement existing yard features and walkways. Identify and mark obstacles and hazards such as electrical lines or other underground utilities to avoid as you dig the footer.
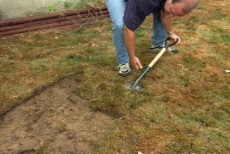
Mark a True Rectangle with Square Corners for the Patio Footer
Mark the four right-angled corners of the patio footer with stakes. String mason’s line around the stakes to outline the perimeter. Measure between each pair of diagonally opposing corner stakes--the distances should be equal if the corners are square.
Cut the Sod from the Rectangle Marked for the Patio
Use flat-bladed shovels to cut the sod two inches outside the mason’s line as allowance for retaining strips to keep the pavers stationary. Cut the interior sod into small rectangles for later reuse, sliding the shovel beneath for easy removal.
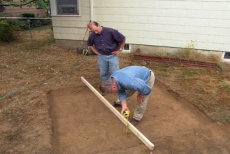
Dig the Hole for the Patio Footer Seven Inches Deep
Excavate the entire patio area to seven inches to allow for gravel, sand and pavers. Measure from the bottom of a board spanning the footer to ensure the seven-inch depth at the sides and middle of the footer.
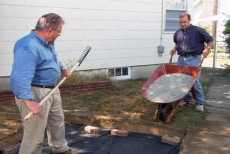
Line the Patio Footer with Landscape Fabric and Gravel
Line the footer with landscape fabric to stop weeds growing between the pavers. Fill the footer with 3 1/2 inches of gravel, then level and tamp it. Both fabric and gravel will allow rainwater to drain into the ground below.
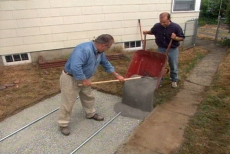
Use Screed Rails to Ensure a Uniform Layer of Sand
Lay two lengths of 1-inch diameter electrical conduit on top of the gravel as screed rails and distribute a 1-inch layer of sand. Glide the edge of a two-by-four along the screed rails to ensure a uniform sand thickness.
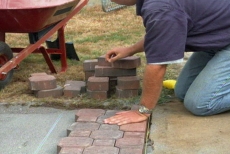
Edge with Paver Border Pieces and Alternate Field Stone Pattern
Start at the patio's edge, fitting straight-edged border pieces along the perimeter and key-shaped field stones in the interior in an alternating pattern. Remove the screed rails, fill the groove with sand and smooth with a wide putty knife.
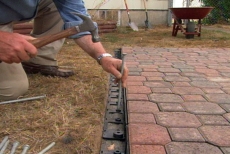
Drive Spikes into L-Shaped Edging to Hold Pavers in Place
Place special L-shaped edging around the patio perimeter to prevent the pavers from migrating. Drive in spikes to hold the edging, placing one at every fourth hole in the ready-made edging.
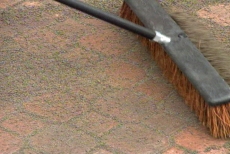
Sprinkle Sand on Patio and Brush into Crevices between Pavers
Add more sand to the surface of the patio and work the sand into the crevices and tiny gaps between the pavers with a stiff-bristled broom.
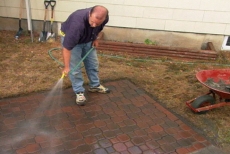
Spray Patio with Water to Wash Sand into Paver Joints
Adjust your garden hose to a fine spray and wet the surface, washing the sand down into the joints. This final layer of sand will stabilize the pavers to minimize shifting.
Related Tips
Blog Articles

Have You Heard of Landscape Glue?
You love the rustic charm of a gravel walkway, but the constant scattering of stones across your lawn and patio can be a real headache. Whether it’s from pets, lawn mowers, or just foot traffic, it seems impossible to keep those stones in place. Sound familiar? Well, Brian shows us a simple DIY method using landscape glue to keep your gravel path looking pristine and, more importantly, in place.

How to Remove Candle Wax Drips: Two Effective Methods
Candles create a warm and inviting atmosphere, but those pesky wax drips can be a real headache. Luckily, Brian shows us a couple of effective methods to tackle this issue, and they involve two very different temperatures: hot and cold. Here, we'll explore two effective methods: one using cold and the other using heat.

Guide to Hanging on Masonry Walls
Ever wondered how to hang that picture frame or shelf on a brick or concrete wall? It can seem daunting, but with the right tools and techniques, it's a straightforward DIY project. This guide breaks down two common methods: using concrete screws and using anchors, making it easy for you to tackle your next hanging project.


