How to Repair Broken Floor Tile
Learn how to replace loose or broken ceramic floor tiles
Repair floor tile by first diagnosing what is causing the damage. Here the failure results from a flexing 3/4-inch subfloor that pops the tiles loose--a minimum 1-inch substrate is required to support ceramic floor tile. We remove the debris and set fresh tiles in thinset mortar mixed with an acrylic or latex additive for a stronger bond.
Read More
Diagnose the Cause for the Loose or Damaged Tiles
Determine if inadequate subflooring is allowing the tile floor to flex and pop tiles off. A minimum 1-inch substrate should be installed before retiling to make a permanent tile repair, but we patch rather than completely redo the tile floor.

Remove Loose Tiles and Dried Thin-set Debris
Use a large putty knife and hammer to pry up loose tiles without breaking them and scrape the hardened thin-set mortar from the subfloor. Tiles may be reusable if the mortar comes off the back cleanly.

Mix a Batch of Fast Setting Mortar with Latex Additive
Add water per manufacturer's directions to powdered thin-set mix that contains an acrylic or latex additive for a better bond. Mix it with a paddle on a power drill and let it slake for a few minutes.

Trowel the Mortar onto the Tile Floor to Be Patched
Spread the mortar over the tile floor repair area, pressing it firmly in contact with the crevices in the substrate with the smooth side of a trowel. Use the notched side to rake the mortar into uniform furrows and ridges.

Position and Seat the Whole Tiles in the Mortar
Drop each whole tile into position, pressing and wiggling it gently to seat it in the mortar. Align the tiles and joints with those in the undamaged portion of the tile floor.

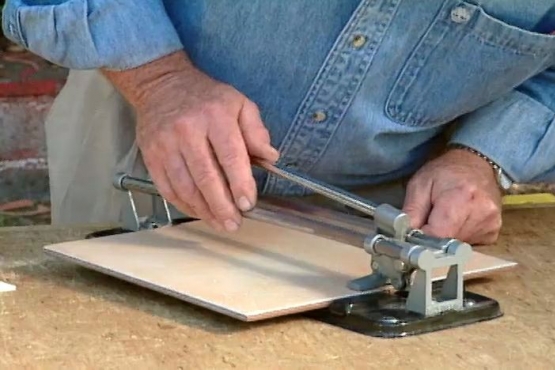
Cut Partial Tiles on a Water-cooled Tile Saw
Measure and then cut tiles on a water-cooled saw to fill in around the edge of the tile floor and cover the face of the steps. The water jet keeps the saw blade cool and ensures precise cuts and smooth edges.

Tap Tiles Gently with a Mallet to Seat Them
Tap each tile gently with a mallet and piece of two-by-four to seat it in the mortar. Tapping against a piece of wood distributes the force of the blow and protects the face of the tile. Dry for two hours.

Apply Tile Grout to Joints Using a Rubber Float
Mix grout and force it into the tile joints with a rubber float. Rake the float across the tiles at an angle to remove excess grout without pulling it out of the joints. Allow the grout to firm.

Clean the Tile Faces with a Sponge and Water
Wring out the sponge in a bucket of water and wipe the excess grout from the face of the tile. Clean the sponge and change the water frequently. After three or four cleanings, let it dry to a haze.

Remove the Grout Haze with a Clean Dry Cloth
Buff the grout haze off the surface of the new tiles with a clean dry cloth. If the existing floor has sealed grout joints, seal the new joints after the floor has cured.
Related Tips

Blog Articles

Have You Heard of Landscape Glue?
You love the rustic charm of a gravel walkway, but the constant scattering of stones across your lawn and patio can be a real headache. Whether it’s from pets, lawn mowers, or just foot traffic, it seems impossible to keep those stones in place. Sound familiar? Well, Brian shows us a simple DIY method using landscape glue to keep your gravel path looking pristine and, more importantly, in place.

How to Remove Candle Wax Drips: Two Effective Methods
Candles create a warm and inviting atmosphere, but those pesky wax drips can be a real headache. Luckily, Brian shows us a couple of effective methods to tackle this issue, and they involve two very different temperatures: hot and cold. Here, we'll explore two effective methods: one using cold and the other using heat.

Guide to Hanging on Masonry Walls
Ever wondered how to hang that picture frame or shelf on a brick or concrete wall? It can seem daunting, but with the right tools and techniques, it's a straightforward DIY project. This guide breaks down two common methods: using concrete screws and using anchors, making it easy for you to tackle your next hanging project.


